Open-Joint Siding
With the right underlayment, this rainscreen variant provides waterproofing, drainage, and a striking appearance
Open-Joint Siding
In the Seattle area, where I work, we get a lot of rain. From the mid-90s to the mid-2000s, there were many high-profile cases of water damage caused by improperly detailed siding, mostly on condos and other multifamily housing. Washington state now has some strict code requirements for siding systems in this housing category, but concern about water dam- age has filtered down into the single family sector as well. Lately we’ve been seeing a lot of rainscreen siding, which is designed to allow wind-driven rain to drain from behind the siding and to promote rapid drying. Although conventional siding installations still probably outnumber rainscreens, I’ve seen them grow more popular every year since I installed my first rainscreen job in 2004.
A Gap Between Courses
On the project shown here, we used a variant of rainscreen siding that I have installed several times in the past few years. Called open-joint rainscreen, it’s made up of siding courses that aren’t overlapped or butted together in any way. Instead, they’re deliberately spaced a fraction of an inch apart, which lets air circulate even more freely than it does behind a conventional rainscreen application.
Let it flow.
Of course, wind-driven rain also passes easily through the siding. But a carefully taped and flashed layer of specialized underlayment reliably sheds water, and the open joints promote rapid drying.
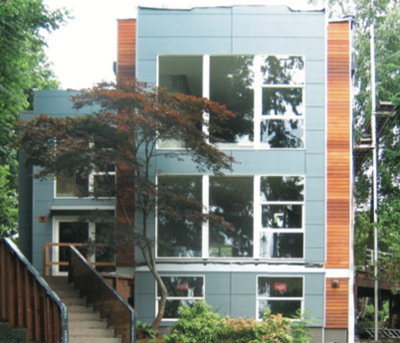
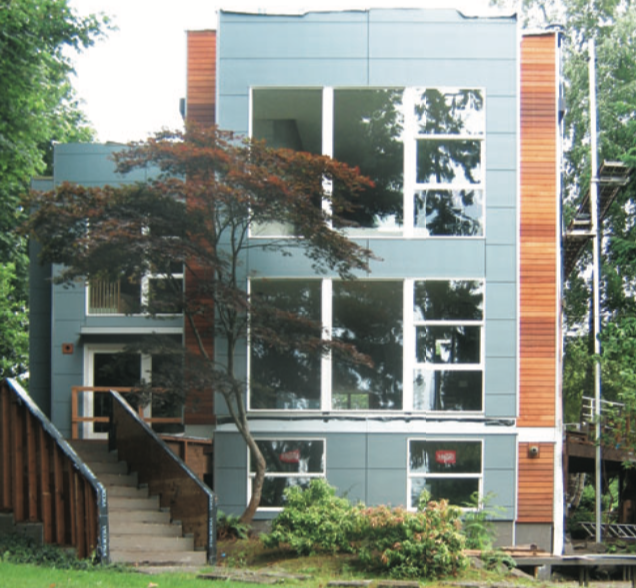
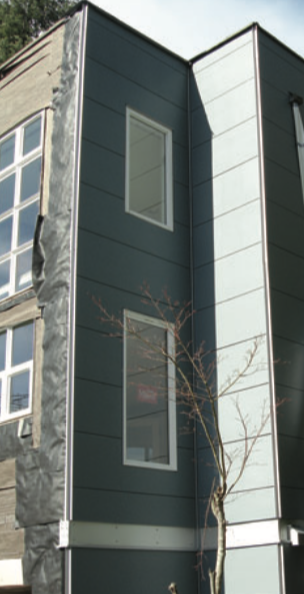
Open-joint rainscreen siding has a distinctive appearance that lends itself well to some architectural styles. The project described in this story involved extensive repairs to a 1980s house that had numerous problems due to poor flashing details and poorly installed windows. After stripping off the original, badly deteriorated board siding and dealing with some structural and waterproofing issues, we installed a combination of new fiber cement panel siding and horizontal cedar boards that gave the structure a distinctive new look (see Figure Below).
Underlayment and Battens
Our preferred water-resistant barrier material for open-joint applications is Wrap- Shield, from VaproShield. It’s a polymeric-based weather-resistive membrane that staples to the sheathing like Tyvek or building paper. Unlike either of them, though, it’s actually a fabric like material that self heals around fasteners.
Light through the siding.
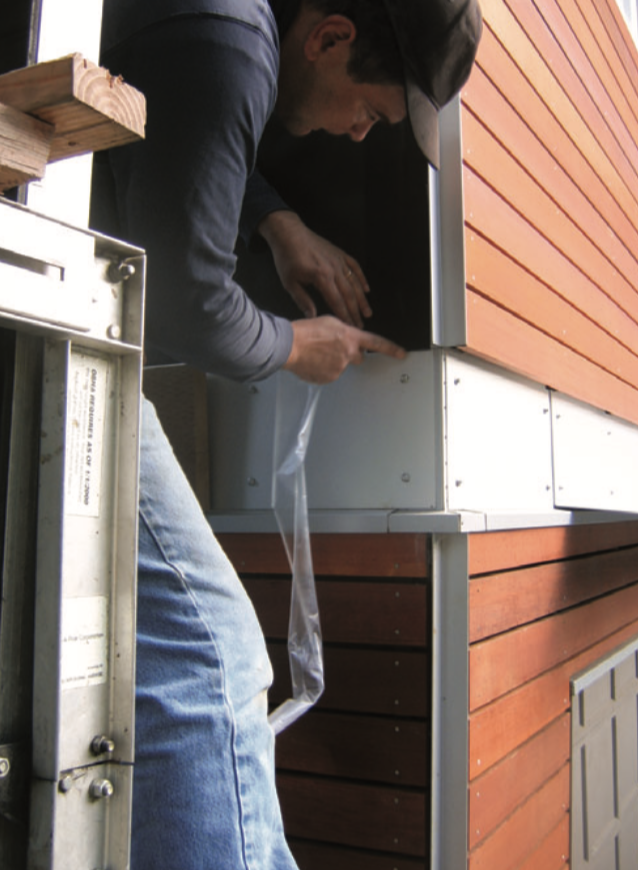
Another key feature of the membrane is its high degree of UV resistance. This is critical, because sunlight that passes through the open joints between courses of siding will eventually cause a conventional weather-resistant barrier to fall to pieces. According to the manufacturer, WrapShield can be left exposed for up to 180 days if installed as specified for open-joint applications.
Those specifications call for a double layer of the material in areas near open joints in the siding. Where narrow siding is used, such as the 4-inch cedar we used on parts of this project, that means two complete layers.
But if joints between courses of siding are more widely spaced — as they were on the portions of the job that were covered with fiber cement panels — it’s possible to save material by installing one full layer, then stapling 6-inch strips of membrane centered on all horizontal and vertical joints (See Figure Below). That approach does add labor, but because the membrane is expensive — more than $300 for a 59-inch-by-164-foot roll — I find that it’s well worth the effort on some projects.
Choosing the right battens.
VaproShield offers its own battens, but I don’t like them. For some reason they’re made of white vinyl, which makes them stand out visually between the spaced courses of siding. They’re also prone to buckling as they expand in the heat, and they tend to split and crack when they are nailed.
Wood battens — usually made from pressure-treated 1x4s — are a popular choice around here for open joint siding applications. They can be ripped to a narrower dimension, but I prefer not to do that, because the exposed rips may not be thoroughly treated with preservative, and treating the rips with a brush takes a lot of time.
Using 1×4 battens full width, on the other hand, introduces another problem. Because the whole purpose of rainscreen siding is to allow the free transfer of water vapor to minimize the amount of moisture trapped against the membrane, it seems counterproductive to cover more than 20 percent of the surface of the wall with moisture absorbing wood battens.
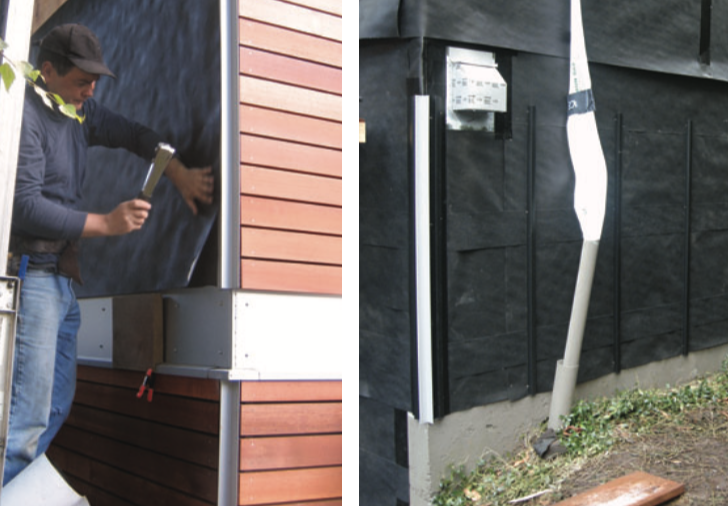
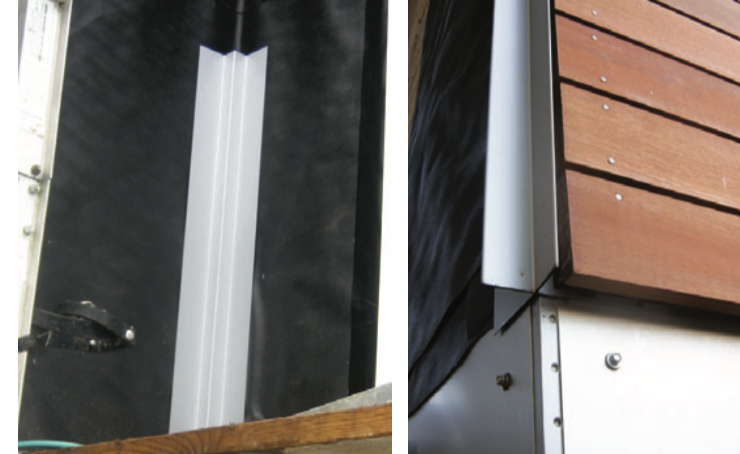
My solution is to use a black Kynar coated hat channel that I have bent to my specifications from 26-gauge sheet metal. It’s durable, thermally stable, easy to work with, and covers only a fraction of the wall space taken up by wood battens. The black finish also makes it inconspicuous visually. For this project, our sheet-metal sup- plier also provided custom inside corner trim and some folded pieces of corner trim with an X-shaped profile (See Figure Below).
Layout and Fastening
When you’re using a wide cladding material, it’s important to space and fasten the battens correctly. Panel manufacturers have guidelines for fastening their mate rials to the wall based on wind loads. They prescribe the types of nails or screws required, the spacing, and how much of the fasteners should embed into the framing or sheathing.
Ideally, battens that serve as a base for fiber cement panels should be aligned with the studs and fastened to them with nails or screws driven through the sheathing and into the framing. In new construction, studs at vertical joints between panels are ordinarily doubled to accept a pair of closely spaced parallel battens (See Figure Below).
When the siding is installed, that strategy keeps the nails far enough back from the panel edges to prevent any cracking of the material.
An engineered solution.
Since this was a re-siding project, however, we had to make the best of the existing framing, in which the studs didn’t even line up vertically between floors. To get the vertical panel joints to line up over the full height of the building, we had an engineer develop a fastening schedule for the battens that didn’t depend on the framing. At his recommendation, we fastened the battens to the framing at the plates, but elsewhere used 11⁄4-inch ring-shank stainless steel nails to fasten them directly to the plywood sheathing. According to the engineer’s calculations, spacing the nails 8 inches on-center would be more than adequate to support the shear load of the panels as well as any expected wind load.
Although we were confident that our approach would work, it didn’t comply with Hardie’s installation instructions, which specify that the battens are to be fastened to the framing along their entire length. I was careful to point out to the owners that if the engineer was wrong and panels began to fall off the walls, the manufacturer’s warranty would probably be void and it would be their responsibility. It’s also important to note that this fastening schedule was developed for our particular situation and shouldn’t be seen as a one-size-fits-all solution.
Coursing and installation.
Once the battens were in place, I set up a laser on the roof and measured down to all the window heads. This confirmed my suspicion that their heights varied too much to allow us to align the horizontal coursing with them. I then sketched a panorama of window sizes and kept adjusting it until I found a way to keep the panel edges well away from the windows while avoiding breakage-prone small rips (Figure 5).
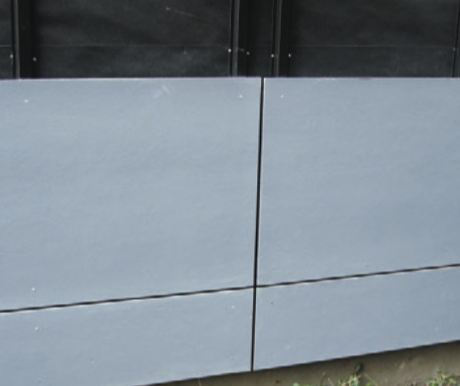
The resulting courses were 213⁄4 inches wide, making it possible to rip them from 4×8 and 4×10 sheets with relatively little waste. The panels themselves were pre-finished, but we had to paint the cut edges.
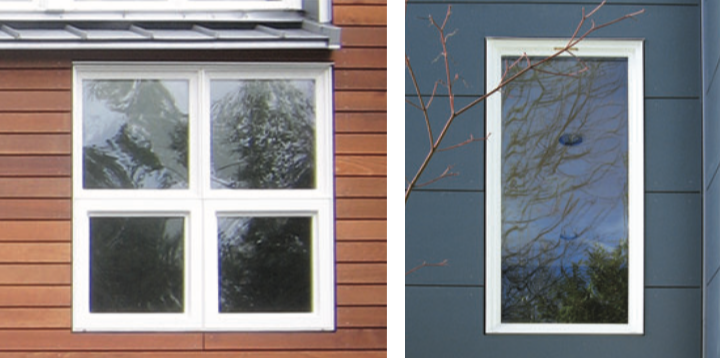
No applied window trim was used. Because the windows were completely flashed and weatherproofed at the plane of the membrane, no further flashing was needed at the level of the siding. Both the fiber cement panels and the cedar boards (where used) stop just short of the projecting window frames, maintaining the same 1⁄4-inch gap used between courses (See Figure Below).
Cite: Original Article (Open-Joint Siding)